Thanks for stopping by. My blog has moved to www.angelascrafthut.co.uk. I'd love to see you over there.
Angela x

Sunday, 1 September 2013
Monday, 29 July 2013
Oh I do Like to be Beside the Seaside
I most certainly do! Where has July gone? I can't believe it's August on Thursday. This month's Clarity Challenge is certainly one I relate to, as I really love being by the coast. It is my place to rejuvenate myself and find peace. My card tries to reflect this.

I first lightly brayed a Whisper White, from Stampin' Up! circle using Soft Sky ink (from Stampin' Up!, as are all the other inks). I sponged Island Indigo ink from the horizon down to deepen the colour of the sea, and then made it look more watery by running an inked brayer over scrunched up A4 copy paper.

I added sponged an island to the horizon using a little mask I made and Soft Suede and Gumball Green ink. The sand was created, using a brayer and Crumb Cake ink, and the little hillocks were added using a mask and sponging extra Crumb Cake ink, to give some depth. I used Clarity's Oats stamp to create the sea oats, which were stamped in Gumball Green and Certainly Celery. I used Clarity's cloud mask to add some dimension to the sky. The completed scene was layered onto Pool Party paper from Stampin' Up! and adhered to a card base. I used a scalloped square from my stash.
I love looking for sea shells when strolling along the beach and thought Clarity's Large Shell Corner was a great way to finish the card as well as represent this idea. I stamped the shells in Soft Suede, fussy cut them and used a selection of Promarkers to colour them in.

As well as a close up of the shells you can see the clouds a little more clearly.
Thank you for stopping by today.
Angela
Ingredients
Stamps: Clarity Oats, Clarity Large Shell Corner
Card: Stampin' Up! Whisper White, Poole Party, Card base from stash
Ink: Stampin' Up! Soft Sky, Island Indigo, Crumb Cake, Soft Suede, Gumball Green, Certainly Celery
Other: Clarity Cloud mask, Promarkers
Saturday, 6 July 2013
She'll Thank You
Hello everyone I hope you are well. I'm posting the last of the batch of thank you cards I've made recently. From the title of this post can you guess what I've used? Yes one of the beautiful new shell stamps from Clarity.
These shells remind of ones my sister and I saw on the beach in Florida, the day after Tropical Storm Andrea hit the area! Which is probably why I decided to use it.

I've used the Shell Cluster stamp, and stamped it onto Clarity Theuva card in Stampin' Up! Early Espresso ink. Using the Clarity mask to protect the shells, I gently sponged Stampin' Up! So Saffron ink to give the feeling the shells are on the sand. I then coloured the shells using a selection of Promarkers.

I stamped the large Thank You sentiment from Clarity, in Early Espresso and layered the completed image onto Stampin' Up! so saffron card, which was layered onto a card base from my stash.
Thank you for stopping by.
Angela
Ingredients
Stamps: Clarity Shell Cluster, Large Thank You
Ink: Stampin' Up! Early Espresso, So Saffron
Card: Clarity Theuva card, Stampin' Up! So Saffron
Other: Promarkers, card base
Friday, 5 July 2013
Marry Me!

This was then layered onto a card base from my stash, on which I placed a strip of Stampin' Up! Whisper White Organza ribbon, trimmed to the shape of the card.
I decorated the top left and bottom right corner of the card with a flourish cut from Whisper White card using Spellbinders Die D-Lites Fantastic Flourish One.
I added a couple of Stampin' Up! Pearl Basic Jewels. The sentiment also comes from the Marry Me set and was heat embossed in silver, and die cut using one of the tags from Spellbinders Fancy Framed Tags Two, and topped of with two more Pearl Basic Jewels.

I placed the sentiment to the bottom left of the card, and added a few more pearls to the top right to balance the look.
I finished the card by stamping in Stampin' Up Basic Gray a quote from William Shakespeare, also from the Marry Me set, on the inside of the card, along with the flowers from the same set.

Tip: When heat embossing first cover your card with talcum powder as this will help prevent stray bits of embossing powder sticking to your card.
Thanks for stopping by.
Angela
Ingredients
Stamps: Stampin' Up! Marry Me (retired)
Ink: VersaMark, Stampin' Up! Baisc Gray
Card: Stampin' Up! Whisper White, card base
Other: Spellbinders dies, Stampin' Up! Pearl Basic Jewels, embossing powder-Sticky Stuff, Frosted Leaves gilding flakes
Thursday, 4 July 2013
Fishes and Coral
Hello everyone I hope you are enjoying the tennis, even if you are not a fan you have to agree that this year's Wimbledon has thrown up all sorts of surprises.
I have another thank you card to show you today, I really do make other cards as well, and will be show casing more of them very soon. Here is today's card:


I have another thank you card to show you today, I really do make other cards as well, and will be show casing more of them very soon. Here is today's card:

I've used Clarity Tropical Fish 3 and Clarity Coral. Using Clarity's Theuva card I stamped the fish in Adirondack Black, masked it with a post-it note and then stamped the coral in Stampin' Up! Calypso Coral. I then coloured the image using a selection of Stampin' Up! marker pens.

I used the large Thank You stamp from Clarity and stamped it in Adirondack Black. Theuva card was then layered onto Stampin' Up! Calypso Coral card before being mounted on a card base from my stash.

I have a number of ideas for these stamps which I hope to be able to show at some point. I don't seem to have a great deal of time for stamping at the moment and with a stack of ideas to get through it is quite frustrating. I hope to be able to remedy the situation somewhat this weekend.
Thank you for stopping by
Angela
Ingredients
Stamps: Clarity Tropical Fish 3, Coral, Large Thank You
Ink: Adirondack Black, Stampin' Up! Calypso Coral
Card: Clarity Theuva Card, Stampin' Up! Calypso Coral
Other: Selection of Stampin' Up! Markers, card base
Wednesday, 3 July 2013
A Boating Thank You
Hello and welcome to today's blog. A couple of posts back I mentioned I had been busy making thank you cards. Today I'm showing you the one I made for my brother-in-law - Brad. His first love (next to my sister!) is the water and in particular being on his boat on the Gulf. I have to say that it's great fun and one of the things I look forward to doing whenever I visit my sister in Florida. As well as seeing her of course!
So what better image to use than that of a boat:

The main image is Clarity's Boat stamp, which has been stamped onto Stampin' Up! whisper white card using Stampin' Up! pool party ink. The sea was added using one of the stamps from the Clarity Remountable Texture stamp set, again in pool party. The completed image was layered onto Stampin' Up! pool party card. You can see the sea a little clearer on this image.

I added a banner to the left of a larger piece of whisper white card made using paper from Stampin' Up! DSP In color 2012/2014 for the base which has been topped by paper from docrafts Papermania Ahoy There! paper pad.
The sentiment is the Clarity large Thank You stamp, stamped in pool party, before the smaller image was added to the larger white card which was then layered onto a card base in pool party.

Pool Party is a lovely colour and always reminds me of water.
Thanks for stopping by today.
Angela
Ingredients
Stamps: Clarity Boat ( BOAT-F), Remountable Texture stamp set ( REMTEX-J), Large Thank You ( MG019-D)
Card: Stampin' Up! Pool Party, Whisper White, In Color 2012/2014 Designer Series Paper
Ink: Stampin' Up! Pool Party
Other: docrafts Papermania Ahoy There! paper (6 x 6)
So what better image to use than that of a boat:


I added a banner to the left of a larger piece of whisper white card made using paper from Stampin' Up! DSP In color 2012/2014 for the base which has been topped by paper from docrafts Papermania Ahoy There! paper pad.
The sentiment is the Clarity large Thank You stamp, stamped in pool party, before the smaller image was added to the larger white card which was then layered onto a card base in pool party.

Pool Party is a lovely colour and always reminds me of water.
Thanks for stopping by today.
Angela
Ingredients
Stamps: Clarity Boat ( BOAT-F), Remountable Texture stamp set ( REMTEX-J), Large Thank You ( MG019-D)
Card: Stampin' Up! Pool Party, Whisper White, In Color 2012/2014 Designer Series Paper
Ink: Stampin' Up! Pool Party
Other: docrafts Papermania Ahoy There! paper (6 x 6)
Sunday, 30 June 2013
Happy Anniversary
Hello! As I mentioned yesterday, I made two cards for the Clarity Stamp Challenge but had a problem finishing one of them. In a moment of clarity I thought of turning the small 5 inch square card into an easel card! I just couldn't see it at the time - but I guess we all have moments like that.

I stamped the Clarity Calla Lilly onto Clarity Theuva card in Versamark and then used Stampin' Up! embossing powder in silver and heat embossed the image.

The card was then die cut using one of the dies from Spellbinders Decorative Labels One and layered onto Stampin' Up! bashful blue card, which had been die cut the smallest die from Spellbinders Grand Decorative Labels One. The whole was then adhered to the bottom half of a white card I had in my stash. The sentiment from Clarity's Remountable Happy Words was stamped using Distress Ink Black Soot onto Theuva card. The corners were rounded and layered onto bashful blue card which also had the corners rounded.

The sentiment was then adhered to the inside of the card at an angle, using foam tape to give height and to hold the easel part of the card.
As I mentioned yesterday, I haven't decided which of the two anniversary cards I will send to my parents for their 56th Wedding Anniversary.
Thanks for stopping by today.
Angela
Ingredients
Stamps: Clarity Calla Lilly, Remountable Happy Words
Ink: Versamark, Distress Ink Black Soot
Card: Clarity Theuva card, Stampin' Up! Bashful Blue
Other: Stampin' Up! Silver Embossing Powder, Spellbinders Decorative Labels One, Grand Decorative Labels One, We R Memory Keepers Cropadile Corner Chomper, foam tape
Saturday, 29 June 2013
Clarity Challenge 4 - Mr & Mrs
Hello everyone, I was very pleased to be chosen as one of the top 5 in last month's Clarity Stamp challenge with this card. This month's Clarity Stamp challenge is Mr & Mrs, and includes weddings and anniversaries. I've stayed with a straight forward layout again this month, mainly due to time!

As it's my parents' 56th wedding anniversary later in July, I thought I'd make a card for them. I'll be honest, this wasn't the original idea I had, that card I'll post tomorrow. I made a smaller card, and the sentiment didn't fit it properly, so I started again. I then had a moment of 'clarity' and came up with a way of finishing the original card!!!! Anyway back to this card.
I love the Calla Lily stamp and so I stamped it using Stampin' Up! basic grey ink onto Clarity Theuva card which was then die cut using Spellbinders' Labels Twenty-Eight dies. I painted the Calla Lily with a selection of micra paints to give the flower dimension.

The whole was then layered onto a card base I already had, using foam tape to give the card dimension. The sentiment was then stamped in Stampin' Up! Basic Grey ink and Stampin' Up! pearl basic jewels were added to the top and bottom of the green layer.

Mum and Dad look at my blog so this is a bit of a give away as to what their anniversary card will look like this year. Of course I could decide to send the other one I made just to keep them on their toes!!
Thanks for stopping by and good luck if you have entered the Clarity Stamp Challenge.
Angela
Ingredients
Stamps: Clarity Calla Lilly, Remountable Happy Words set
Ink: Stampin' Up! Basic Grey, So Saffron
Card: Clarity Theuva card, Stampin' Up! Old Olive
Other: Perfect Pearls Micra powders, Stampin' Up! Pearl Basic Jewels, Spellbinders Labels Twenty-Eight, foam tape

As it's my parents' 56th wedding anniversary later in July, I thought I'd make a card for them. I'll be honest, this wasn't the original idea I had, that card I'll post tomorrow. I made a smaller card, and the sentiment didn't fit it properly, so I started again. I then had a moment of 'clarity' and came up with a way of finishing the original card!!!! Anyway back to this card.
I love the Calla Lily stamp and so I stamped it using Stampin' Up! basic grey ink onto Clarity Theuva card which was then die cut using Spellbinders' Labels Twenty-Eight dies. I painted the Calla Lily with a selection of micra paints to give the flower dimension.

I've tried to capture the shimmer from the paints. The right hand bloom is the right colour, the others have come out much darker, thought I think you can get an idea of the finished image. I inked the edges of the Theuva card with Stampin' Up! So Saffron ink and then layered the image onto Stampin' Up! Old Olive card die cut in the next size up in the Spellbinders Labels Twenty-Eight die setThe whole was then layered onto a card base I already had, using foam tape to give the card dimension. The sentiment was then stamped in Stampin' Up! Basic Grey ink and Stampin' Up! pearl basic jewels were added to the top and bottom of the green layer.

Mum and Dad look at my blog so this is a bit of a give away as to what their anniversary card will look like this year. Of course I could decide to send the other one I made just to keep them on their toes!!
Thanks for stopping by and good luck if you have entered the Clarity Stamp Challenge.
Angela
Ingredients
Stamps: Clarity Calla Lilly, Remountable Happy Words set
Ink: Stampin' Up! Basic Grey, So Saffron
Card: Clarity Theuva card, Stampin' Up! Old Olive
Other: Perfect Pearls Micra powders, Stampin' Up! Pearl Basic Jewels, Spellbinders Labels Twenty-Eight, foam tape
Friday, 28 June 2013
By the Seashore Layered Card
Those who know me well know how much I love to be by the coast. Just being by the sea for a few hours seems to restore me both physically and mentally. I have a number of cards planned to reflect the sea or coast line which I will post once completed. Today's card uses elements from By the Seashore from Stampin' Up!

To make the card you need three layers of white card and three layers of coloured card, including the card base. The coloured card measurements are A5 (card base), 12.3 x 8 cm and 9.8 x 5.5 cm. The white card measurements are 14.3 x 10 cm, 11.8 x 7.5 cm, 9.3 x 5 cm. Layer up the white card and hold in place with glue dots or small strips of repositionable tape (be careful not to stick the layers together permanently).
I've used the starfish and sand dollar from the set and stamped them randomly onto the Stampin' Up! whisper white card in Stampin' Up! pool party and indigo island. The images won't stamp perfectly, because of the layers, but any unstamped areas of the image should be covered by the coloured layers.
When you have completed the stamping layer the white card onto the coloured card (in this instance I've used Stampin' Up! island indigo card).

Here is a close up of how the layers fit together. I have added a sentiment from Stampin' Up! Itty Bitty Banners, and then die cut using Stampin' Up! Itty Bitty framelits. This was added to the top layer with foam pads. Before adhering the smallest white layer to the smallest indigo island layer I wrapped some Stampin' Up! poole party bakers twine around it.
I added an insert on which I also stamped a starfish in pool party to pull the card and insert together.

On my latest trip to Florida, to see my sister Gillian, we collected a few Sand Dollars from the beach. These had been washed up by Topical Storm Andrea. I love these creatures, which are flat sea urchins and the legend that goes with them is just as beautiful. You can read a version of the poem here.
Thanks for stopping by.
Angela
Ingredients
Stamps: Stampin' Up! By the Seashore, Itty Bitty Banners
Ink: Stampin' Up! Pool Party, Island Indigo
Card: Stampin' Up! Whisper White, Island Indigo
Other: Stampin' Up! Itty Bitty framelits, Pool Party Bakers Twine, foam pads from stash
Thursday, 27 June 2013
Humming Bird Birthday
Hello! As you may know from an earlier post of mine, I find making cards for my male colleagues challenging at times. Today's card was made for one of my mature friends and I thought I'd bring him some colour in the form of a Humming Bird:

Hopefully you can see that the flowers have a slight shimmer to them. This was achieved by painting over the flowers and the bird with Twinkling H2Os, which is why I used Stazon ink, Adirondack ink would have smudged with the paint. The card's corners were rounded and layered onto Stampin' Up! Primrose Petals card, which also had the corners rounded. This was then layered onto white card from my stash. The sentiment from Clarity was stamped using Stamping' Up! Primrose Petal ink.I also stamped the card insert with the Clarity large trumpet flower:

Thanks for stopping by today.
Angela
Ingredients
Stamps: Clarity XL Postage Stamp, Humming Bird, Large Trumpet Flower
Ink: Black Stazon, Stampin' Up! Primrose Petals
Card: Clarity Theuva card, Stampin' Up! Primrose Petal, white card from stash, paper for insert
Other: Clarity XL Postage Stamp mask, We R Memory Keepers Crop-a-dile Corner Chomper, Twinkling H20s, Stampin' Up! water-based markers
Wednesday, 26 June 2013
In the Garden
Today's card is one I made for my brother-in-law, Brad. He has recently gotten the bug to grow his own vegetables, and so far he and my sister have been very successful at it. They have faced their challenges, growing vegetables is not the easiest thing to do in Florida when your soil is mainly sand, as it is in their case. So the vegetables are in boxes with their own watering system. I thought he would enjoy receiving a card depicting a garden and so I sent him this:

As you can see I've put flowers in the garden as opposed to vegetables! I stamped the Clarity XL postage stamp in Adirondack black onto Clarity Theuva card and then protected the area around the stamp with the outer part of the Clarity XL postage stamp mask. I started the picture by covering up the upper part of the postage stamp and brayering the grass in Adirondack Lettuce. I then used the Clarity cloud mask to do the sky in Adirondack Stonewashed. The flowers, wheelbarrow and fork are from the Clarity remountable garden set.

Once the interior part of the garden was complete I used the inner part of the XL postage stamp mask to protect the image and then restamped the wheelbarrow and fork, lining up with the original image so only those parts outside of the postage stamp frame were stamped. I then used a selection of Promarkers to colour the images. I also used the chisel end of a Promarker to colour the edge around the white card, giving it a layered look. The darker areas of the lawn were done using a make-up sponge.

The verse is also from Clarity - The Kiss of the Sun and was stamped in Adirondack black onto Theuva card and then die cut using the Labels Collection framelits from Stampin' Up! I coloured the edge of the die cut with the same colour Promarker I used around the edge of the main image. The leaves are in Lucky Limeade card from Stampin' Up! and were die cut using the Little Leaves sizzlit from Stampin' Up!
Thanks for stopping by today.
Angela
Ingredients
Stamps: Clarity XL Postage Stamp, remountable Garden Set, Kiss in the Garden
Ink: Adirondack Black, Stonewashed, Lettuce
Card: Clarity Theuva Card, Stampin' Up! Lucky Limeade
Other: Clarity XL Postage mask, Cloud mask, Promarkers, Stampin' Up! Labels Collection framelits, Little Leaves sizzlits
Tuesday, 25 June 2013
A Foxglove Thank You
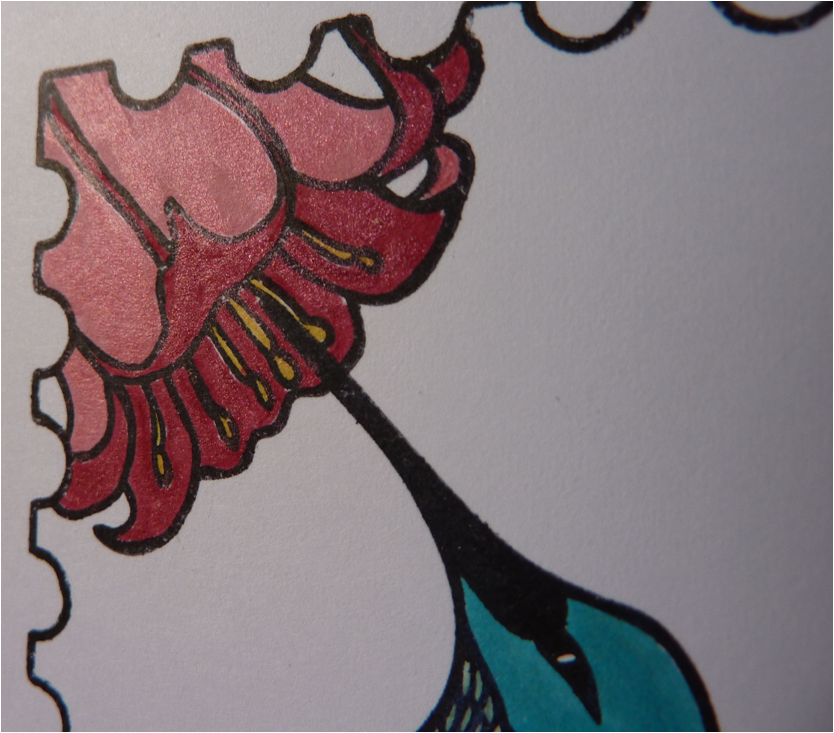
I've been making a few thank you cards recently, using a variety of designs. The first one is based on an idea from the 2 day Clarity Stamps retreat at Cowden in May. The very talented Paul Church led the group on this and from the title you can guess it involves foxgloves. This card was for my sister who now lives in Florida. She loves cottage garden flowers and has a particular soft spot for foxgloves so I knew this would be perfect for her:

These gorgeous flowers are the Clarity remountable Foxglove set. They are large stamps, and indeed the best way to stamp the largest flower is to use a ruler. You may have seen Barbara demonstrating this on TV. The flowers were stamped, onto Clarity theuva card in Adirondack Black and coloured using a selection of Promarkers.
I then highlighted the flowers with Crystal Effects from Stampin' Up!, but Glossy Accents from Ranger would work just as well. On the retreat we used a Versamark pen and clear embossing powder to give a similar result. Here is a close up of the effect:

You can see how the light is reflecting off of the flowers. The background was created using the cloud mask from Clarity and Adirondack stonewashed ink. The sentiment is also from Clarity:

The area for the sentiment was masked with a post-it note to keep it protected when inking in the clouds, which can be seen a little better in this picture. The outline was then made free-hand with a black micro pen.
I then layered the picture onto wisteria wonder card from Stampin' Up! which picks up the colours of the flowers.
Thanks for stopping by today.
Angela
Ingredients:
Stamps: Clarity remountable Foxgloves, Thank you
Ink: Adirondack Black and Stonewashed
Card: Clarity Theuva card, Stampin' Up! Wisteria Wonder
Other: Promarkers, Clarity Cloud mask, Stampin' Up! Crystal Effects, micro pen, post-it note
Monday, 24 June 2013
Baby Blue Waterfall
Don't you just love making baby cards? I find making a card to welcome a new life so special. Today's card was made for a friend of mine who had a baby boy about four months ago now. He didn't take as long to appear as including this card on my blog has! I'm sure his mum is very grateful for that.
I wanted to make a different type of baby card, well different for me anyhow, and decided on a waterfall layout.

All the blue card is Stampin' Up! marina mist, and the white card is Stampin' Up! whisper white. The background has been die cut using a Spellbinders die, and before removing the card I inked the edges in marina mist. The images on the waterfall are from the Bundle of Love set from Stampin' Up! and have been stamped using marina mist. The brads are also from Stampin' Up!, as is the marina mist ribbon, which has been stapled to the 'pull' area of the waterfall.
Here are the other three images I've used:

The tag part has also been stamped with one of the images in marina mist:

This stamp set also has a lovely sentiment which I stamped on the inside of the card again in marina mist:

The card insert is made using 120gsm white paper from Staples.
Thanks for stopping by today.
Angela
Ingredients
Stamps: Stampin' Up! Bundle of Love
Ink: Stampin' Up! Marina Mist
Card: Stampin' Up! Marina Mist, Whisper White
Other: Spellbinders die, Stampin' Up! brads (retired), Marina Mist ribbon
Saturday, 22 June 2013
Secret Garden Birthday
One of the things I like about making my own cards is the plethora of stuff available for me to use. This does have it's down side sometimes as there is always something new to try out and at times you just have to say no and keep the credit card firmly tucked away.
Today's card doesn't have that much stamping on it making use of embossing and die cutting.

Yes I've used a white, grey and yellow combination again. I promise that not all my cards use these colours, I just really like the way these three work together. My favourite colour is actually blue! The basic grey card has been cut with a Spellbinders die, as has the whisper white card layered onto it. This has then be embossed using an A4 Creative Expressions embossing folder.

I used one of the elements in the Stampin' Up' Secret Garden set to stamp the flowers in daffodil delight, which were then die cut using the Secret Garden framelits dies. The leaves were cut from daffodil delight cardstock using another of the Secret Gardens framelits die. The sentiment is from the Stampin' Up! Made for You set and has been die cut using one of the Spellbinders Die D-lites labels. Before removing the sentiment from the die, I inked around the edge with daffodil delight.
I think the card has a lovely fresh look about it.
Thanks for stopping by today.
Angela
Stamps: Stampin' Up! Secret Garden, Made for You
Ink: Stampin' Up! Daffodil Delight
Card: Card blank from stock; Stampin' Up! Whisper White, Basic Grey and Daffodil Delight
Other: Spellbinders Dies, Creative Expressions A4 folder
Today's card doesn't have that much stamping on it making use of embossing and die cutting.

Yes I've used a white, grey and yellow combination again. I promise that not all my cards use these colours, I just really like the way these three work together. My favourite colour is actually blue! The basic grey card has been cut with a Spellbinders die, as has the whisper white card layered onto it. This has then be embossed using an A4 Creative Expressions embossing folder.

I used one of the elements in the Stampin' Up' Secret Garden set to stamp the flowers in daffodil delight, which were then die cut using the Secret Garden framelits dies. The leaves were cut from daffodil delight cardstock using another of the Secret Gardens framelits die. The sentiment is from the Stampin' Up! Made for You set and has been die cut using one of the Spellbinders Die D-lites labels. Before removing the sentiment from the die, I inked around the edge with daffodil delight.
I think the card has a lovely fresh look about it.
Thanks for stopping by today.
Angela
Ingredients
Stamps: Stampin' Up! Secret Garden, Made for You
Ink: Stampin' Up! Daffodil Delight
Card: Card blank from stock; Stampin' Up! Whisper White, Basic Grey and Daffodil Delight
Other: Spellbinders Dies, Creative Expressions A4 folder
Friday, 21 June 2013
Swallowtail Duo
I love butterflies, and Stampin' Up! has a beautiful stamp of a Swallowtail. I first saw this used by Deena Boos. Here are two ways I've used this stamp.
The first is for a birthday:

The butterfly was stamped in StazOn on to whisper white card which was in turn layered onto black card and then onto the card blank made with Baja breeze card. I then inked a small section using a Baja breeze marker pen.The sentiment is inked up using a Baja breeze marker pen onto whisper white card layered onto Baja breeze card and mounted using sticky pads.
Here is a close up of the sentiment:

I also used this image for a thank you card that I made for my neighbour who looked after my house for my whilst I was in America with my sister.
This time I went for the colour combination of white, yellow and grey, which is fast becoming a favourite of mine. The yellow really lifts the image and reminds me of summer.

I've stamped the butterfly in StazOn and then used a marker in Daffodil Delight to ink up part of the image.
The sentiment was stamped in daffodil delight to match the yellow of the card and then die cut using Stampin' Up's Bitty Banner framelit. The sentiment was then adhered flat to the card.

Here is a close up that also shows off the ribbon in daffodil delight.
Thanks for stopping by today.
Angela
Ingredients
Stamps: Stampin' Up! Swallowtail, Itty Bitty Banner set and A Word For You set
Ink: StazOn, Stampin' Up! Baja Breeze, Daffodil Delight
Card: Stampin' Up! Whisper White, Basic Black, Baja Breeze (now retired), Daffodil Delight, Basic Grey
Other: Baja Breeze ribbon (now retired), Daffodil Delight ribbon, Bitty Banner Framelits
Thursday, 20 June 2013
Metallic Toned Birthday
It was my nephew's birthday recently. So that was the first problem.... the second one is that he is in his early twenties. It really shouldn't be that difficult to make cards for the other half of the population, but I know of many card markers who have a loss of creativity when it comes to male cards.
My nephew lives in America and is a welder - a very good welder - who travels around the country working on huge buildings. The work is tough and in my opinion dangerous but he loves it. He does have hobbies and loves to be by the sea, but I've already made cards with ships, cars etc., and I don't have an image of a welder!
Thankfully, Barbara Gray at Clarity Stamps designed Doug, and he became the main feature on the card.

Doug is really versatile... now I could add a comment here but I won't, I think most of you will have your own ideas about what I may say! Anyhow back to the stamp, as I say Doug is very versatile and can be used in different ways. I tried to link him to my nephew by using metallic shaded mica powders as paint.
The image is layered onto matt gold card, and Doug is accompanied by the Shard stamp, which has also been painted with the metallic mica powders.
I've tried to capture how the mica paints look:

The sentiment is also from Clarity.
I hope my nephew doesn't suddenly take it upon himself to look at this blog. As he is currently in the back of beyond working, we are unable to send his cards to him, so they are with my sister waiting for his return. I think I'm safe as I don't think a young man wielding a blow torch is likely to start reading his Aunt's blog on cards!
Thanks for stopping by.
Angela
Ingredients:
Stamps: Clarity Stamps Doug, Shard and Happy Birthday
Ink: StazOn Black
Card: Card blank from stock, Stampin' Up! brushed gold card, Clarity Theuva card
Other: Selection of Ranger Mica Powders
My nephew lives in America and is a welder - a very good welder - who travels around the country working on huge buildings. The work is tough and in my opinion dangerous but he loves it. He does have hobbies and loves to be by the sea, but I've already made cards with ships, cars etc., and I don't have an image of a welder!
Thankfully, Barbara Gray at Clarity Stamps designed Doug, and he became the main feature on the card.

The image is layered onto matt gold card, and Doug is accompanied by the Shard stamp, which has also been painted with the metallic mica powders.
I've tried to capture how the mica paints look:

The sentiment is also from Clarity.
I hope my nephew doesn't suddenly take it upon himself to look at this blog. As he is currently in the back of beyond working, we are unable to send his cards to him, so they are with my sister waiting for his return. I think I'm safe as I don't think a young man wielding a blow torch is likely to start reading his Aunt's blog on cards!
Thanks for stopping by.
Angela
Ingredients:
Stamps: Clarity Stamps Doug, Shard and Happy Birthday
Ink: StazOn Black
Card: Card blank from stock, Stampin' Up! brushed gold card, Clarity Theuva card
Other: Selection of Ranger Mica Powders
Wednesday, 19 June 2013
Just Because
I know I haven't been around much lately, but hopefully I will be able to post a little more frequently now. I have a number of cards that I have made in the past and not gotten around to posting and with a lot more ideas bubbling around my head there should be plenty to show you.
This card is on that can be used for a number of occasions, or just because you want to send a note to a friend:

I've used very vanilla and crumb cake cardstock and to tie everything together crumb cake ink. The stamps are from the Everything Eleanor, Four Seasons and Vintage Verses stamp sets from Stampin' Up!
Here is a close up of the main image. Topper was punched with the 6cm scallop circle punch, also from Stampin' Up!


Which also shows a close up of the rounded corners on the vanilla cardstock.
Thanks for stopping by.
Products used in this card:
Stamps: Stampin' Up! Elegant Eleanor, Four Seasons, Vintage Verse
Ink: Stampin' Up! Crumb Cake
Other: Stampin' Up! 6cm scallop circle punch, We R Memory Keepers Crop-A-Dile Corner Chomper
This card is on that can be used for a number of occasions, or just because you want to send a note to a friend:

I've used very vanilla and crumb cake cardstock and to tie everything together crumb cake ink. The stamps are from the Everything Eleanor, Four Seasons and Vintage Verses stamp sets from Stampin' Up!
Here is a close up of the main image. Topper was punched with the 6cm scallop circle punch, also from Stampin' Up!

Here is a close up of the sentiment:
Which also shows a close up of the rounded corners on the vanilla cardstock.
Thanks for stopping by.
Angela
Products used in this card:
Stamps: Stampin' Up! Elegant Eleanor, Four Seasons, Vintage Verse
Ink: Stampin' Up! Crumb Cake
Other: Stampin' Up! 6cm scallop circle punch, We R Memory Keepers Crop-A-Dile Corner Chomper
Tuesday, 21 May 2013
It's all in the sentiment
Today's card has been inspired by this month's challenge at Clarity Stamp Challenge where the sentiment is taking centre stage. As you'll see I've gone for the clean and simple look.

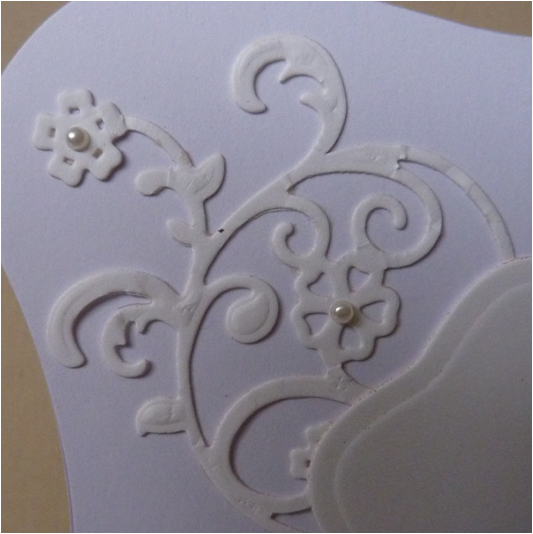
One of my favourite sentiments is Never Forget by Maya Angelou. Here is a close up:

I layered white card with Primrose Petals card from Stampin' Up! and stamped the Small Leafy Swirl in the same colour ink, I then added white dots to the leaves to lift them and added a little bling.

Thank you for visiting my site. If you are visiting from the Clarity Challenge good luck with this month's theme.
Sorry these pictures have a slight lean to them. I'll do better next time!
Ingredients:
Stamps: Clarity Stamps: Never Forget, and the Small Leafy Swirl
Card: Whisper White and Primrose Petals from Stampin' Up!
Ink: Archival black; Primrose Petals from Stampin' Up!
Misc: Small basic jewels from Stampin' Up!; white marker pen
See you soon
Angela
Subscribe to:
Posts (Atom)